I am the guest designer on the DCRU design team blog today! Woot woot!! Lol.... So with that said this may look familiar to you.
Today I will be sharing a SUPER EASY tutorial (So easy even a caveman can do it! Ha!) on how to make this purse that measures 5 1/2 x 4 1/4. The purse will hold 4 cards measuring 5 1/2 x 4, 4 envelopes and small pen. (I've seen a lot of ideas out there for purse tutorials and I am sure this is very similar to a lot of them, so in no way am I taking credit. I just experimented with the measurements and this is what I came up with to suit my needs.)
The supplies you will need and that were used in my photos are:
1 Sheet of 8 1/2 x 11 Card stock (heavy weight is recommended)
Zots,
Embellishments of your choice,
Velcro,
Embossing Folders: Swiss Dots, D'Vine Swirl, Polka Dots, Script Texture
Steps:
1. Using your paper trimmer cut card stock to 11x6 and cut the leftover strip to 10 1/2 x 3.
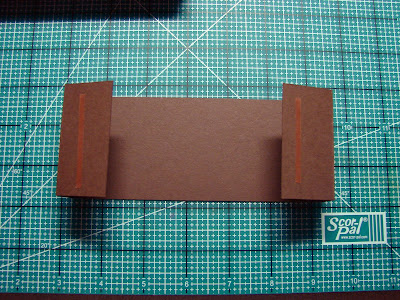
2. Place the 11x6 sheet of card stock on your Scor-Pal and score at: 2 1/2, 3 1/2, 7 3/4, and 8 3/4 as shown in photo. (If you do not have the Scor-Pal mat that fits snug in your Scor-Pal you will need to mark the 7 3/4 and 8 3/4 with a ruler and then score.) Now place the 10 1/2 x 3 strip on your Scor-Pal and score at 1 1/4, 2 1/4, 8 1/4, and 9 1/4 as shown in photo below.

3. Pre-fold score lines. (Once the base is pre-folded notice that one side is slightly smaller than the other. The smaller side is the top of the purse.)
4. Next you will want to apply your Score-Tape or some other super sticky adhesive to the "box" part (10 1/2 x 3) as shown in below photos.

 5. Carefully attach the "box" to the base as shown in photos below.
6. The last part of this tutorial is punching holes for your "strap". You can either punch holes and attach a pretty ribbon as your purse strap or you can get creative and make a paper strap, which I have done, using the Home Accents cartridge with my Cricut Expression. (In the below photo I just eyeballed where to punch the holes.)
 Now all you have to do is pull out your favorite designer paper and embellishments and decorate until your little heart is content! :) Easy peasy lemon squeezy!
 Once you are finished decorating your purse you will want to add some type of closure such as: Velcro, magnetic rounds or buttons. (You can attach a button to the top and one to the bottom and loop twine around like you would find on an interoffice envelope.)
You will want to make some matching cards (5 1/2 x 4) to put inside of your purse.
Here is my finished purse with stationary.


 Why not give this tutorial a try and maybe giving it to a special someone in your life. It's truly better to give than to receive. With that said I would love nothing more than to give one of YOU special readers this purse with stationary. Just leave a comment on the DCRU design team blog today to be entered and the winner will be announced January 9.
One last thing, if you have ANY questions don't hesitate to let me know in the comment section below with a way to get in contact with you.
Happy New Year to all! :)


Yea, Yvette, so happy to see your tutorial! It's beautiful and so perfect! I cannot wait to give it a try myself :)
ReplyDeleteLove the new bloggy look too!!!
Have a wonderful, sweet and blessed new year :*)
~ margie
Yvette,
ReplyDeleteThank you so much for accepting our invitation to be guest designer; your project (and tutorial) is amazing!
Happy New Year!
Claudia (DCRU)